SOCIAL MEDIA

Doll Sized Harry Potter Books!

Friday, January 22, 2016

I don't know how I didn't know these printables were available since my daughter LOVES anything and everything Harry Potter! The free printables for all the books in the series are available from American Girl Ideas and are already perfectly sized for your dolls. I printed them out and using my craft knife I cut some pieces of foam to make up the insides of the books. I can't wait to show my daughter when she comes home from school! So awesome, thanks American Girl Ideas!

post signature

A Little Folk Art for Our Kitchen Area!

Saturday, August 3, 2013

We are trying to "dress up" our kitchen area for the dolls here and one of the recent additions that we did was to make a little faux cross-stitch wall decoration using some foam core board, a printed cross-stitch image found online (google cross-stitch for your kitchen and you will find some cute ones), some scrapbook paper and some basic tools like scissors, a craft knife, glue, etc.


I already has some left over foam core board from another project so I just used a scrap of that and glued my cross-stitch image on to a portion of the board and then cut it out.


I then glued my patterned paper (which was a bit larger than my cross-stitch to leave a border) to some more of the foam core board and cut that out as well.


I inked up the edges of foam core board just for fun, you do not need to do this.


Zoey went outside and found some small twigs and we broke them to be the right size for bordering the cross-stitch.  I attached the twigs using a hot glue gun.


Here is our finished piece of folk art!


Here it is hung above our kitchen sink and stove.  Isn't it so sweet?  It was just the right touch for making our kitchen area feeling a bit more homey.  Now we need to think of what to do for the table area...it's looking pretty bare currently.  What I really would like is to find a longer, white shelf to put little nick-knacks on.  :) We shall see!


post signature

Make Paper Party Lanterns!

Tuesday, July 2, 2013

Stop on over to see our guest post on Doll Diaries for a tutorial on how to make some easy paper party lanterns for your doll this Fourth of July!  They are super easy to make and add a lot of festive decor for any party your doll may be planning!


Kristen had so much fun helping to get ready for the Fourth of July Picnic that the dolls are planning.


Enjoying some good old American hot dogs after all their hard work...


A special "behind the scenes" photo for you of Zoey being a great helper!  :)


Are your dolls ready for the Fourth of July yet?

post signature

How to Make a Diving Board for Your Doll!

Monday, July 1, 2013

Seeing Amanda's post the other day about her dolls having some fun in the water boating made me think about swimming and how our dolls haven't been able to go to the beach yet due to the excessive rain that we've been having here lately.  So, Zoey and I decided to go to our dollar store and Ace Hardware and get supplies to make a pool and diving board for the dolls!

Our supplies consisted of the following:

Scrap pieces of wood as pictured, two thin pieces that will be the board and then three blocks to stack on top of one another for the base of the diving board, duct tape, a large plastic basin/tub for the pool, nails, hot glue and glue gun.


First you will want to hot glue your three pieces of block wood.  These will be the base of your diving board.


Then hot glue your two thin, long pieces together as well for a little more durability so your dolls don't weigh it down too much when standing on it.


Now, using your duct tape, start covering your base with tape.


Do the same with the plank or diving board.


This is what you have so far...


Now, nail your board to your diving board base so that it is secure.  I don't think hot glue would be enough support for this step so if you need to ask a parent to help with hammering than please do so.


Here is your finished diving board!  I think we are actually going to decorate the sides of our board with some fun summer themed stickers but this is what it looks like right now.


We couldn't wait to play with it so got the dolls in their suits and their towels ready so they could test out the water right away!


They LOVE their new pool and diving board!!


  Whee!


Summer friends are the BEST friends!


Thanks Amanda for the inspiration from your previous post!

post signature

Doll Crafting: Make a Doll Salon for Your Dolls!

Monday, May 13, 2013

It's been awhile since we last created a fun backdrop for the dolls so it was time that we put our thinking caps on to figure out what our next one should be.  Zoey suggested a doll salon and since she already has lots of salon accessories I agreed that it was indeed a good idea and we did it!  As with all my other backdrops, I used a foam core board that I found at our local dollar store and adhered patterned papers to it to create the look of paint or wallpaper.  I used strips of cut white paper for a border and to mat the "mirror" which was just mirror card paper that I found at our local scrapbook store.  The stars were puffy stickers that I had also found there.  That's it for the construction of the play piece itself...now on to the play!

Emily came in and needed a deep conditioning treatment as well as some straightening, (she needs to do that once in awhile with the humidity).
                        

Elizabeth took one look at Emily's hair and got busy...first she made sure she was comfortable in her smock so she wouldn't get her pretty outfit all dirty.


And then she led Emily to her chair...she was lucky to get in right away with no appointment, especially since it was the weekend and Mother's Day!


She offered Emily a favorite magazine to read, of course she chose the latest issue of the American Girl Magazine!


After the conditioning treatment Elizabeth got busy straightening Emily's hair.  It's a long process since Emily really has thick and beautiful hair.


Once done, Elizabeth got the hand mirror for Emily so that she could see if she was happy with the new and healthier look.


Emily loves it and is so happy!


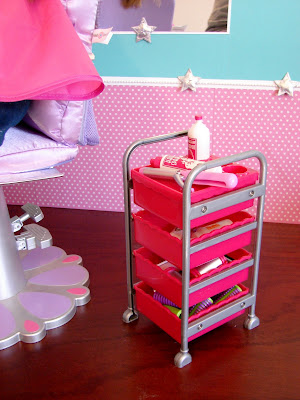
She will be coming back to this salon for sure!  Here are some close-ups of Zoey's new doll salon.  The rolling cart with drawers along with some of the salon tools are from the brand My Generation and it's awesome!  It comes with so much and has lots of play value in our opinion.  We love the curling iron and flat iron perhaps the most.


Then we have the blue hair salon styling caddy that came with lots of hair accessories   Zoey got this from her Grandma for a birthday and it's been great for storage of all those little things and now it goes great with our salon as well!


Here is a final shot of our salon...doesn't it look like a real hair salon?  The mirror looks a bit funky since I had to use two mirror papers (you can see our wreath hanging in the background) but for the dolls it works just great!


We hope we've left you inspired to get busy and create for your dolls today!  Thanks for stopping by!

post signature

Doll Craft - Make a Butterfly Net for Your Doll

Friday, April 12, 2013


Sometimes while I'm cleaning out my craftroom I take a second look at the "to go" pile and BAM a fun idea is born.  This time it's butterfly nets for the dolls!

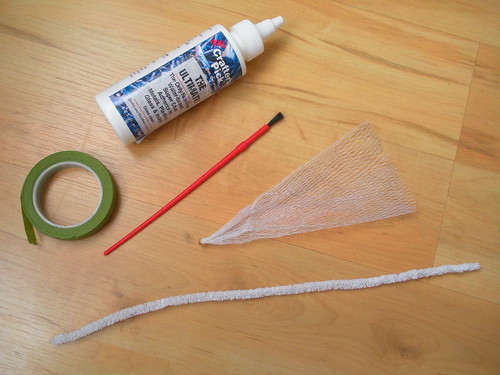
To make one for your doll you'll need the following:
Pipe cleaner or craftwire
Plastic paint brush (mine was from a childs watercolor paint set)
Mesh net bag (mine originally came with marbles, could use mesh bags from produce department of grocery store items)
Glue
Floral tape

Doll Bug Net Supplies

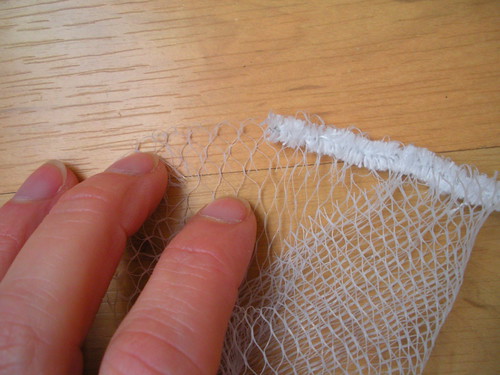
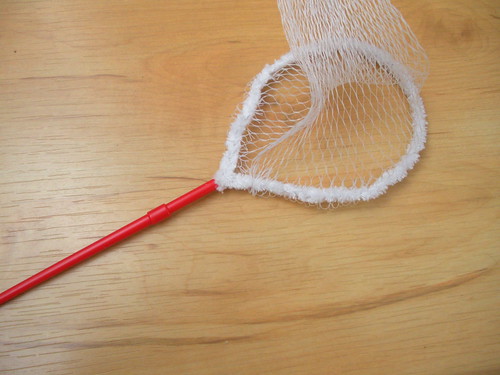
Step 1: Take the open end of your mesh bag and fold a 1/2" towards the inside.  Then weave the pipe cleaner in and out of the loops all the way around the opening.

Doll Bug Net 1

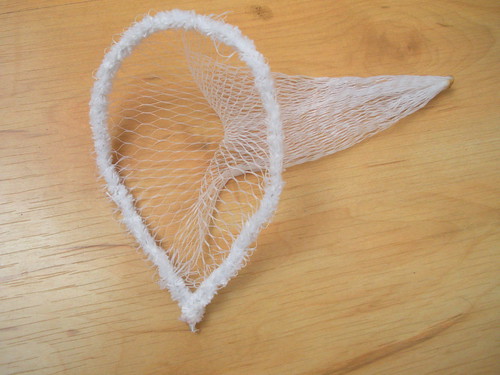
Step 2:  Space the netting while shaping the wire into a balloon.  Twist the ends together.  Snip off any extra wire.

Doll Bug Net 2

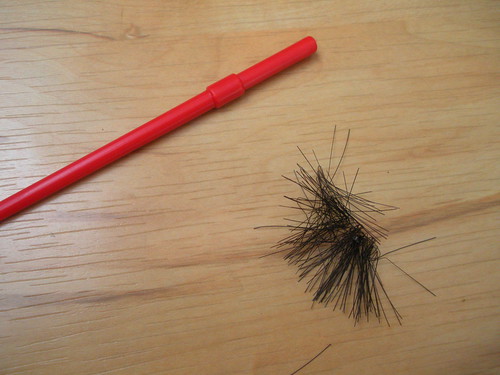
Step 3:  Remove the bristles from your paint brush and throw them away. 

Doll Bug Net 4

Step 4: Put a dab of glue into the hole of the paint brush and then insert the  twisted wire ends.  Do not worry if the wire does not fit securely.

Doll Bug Net 3

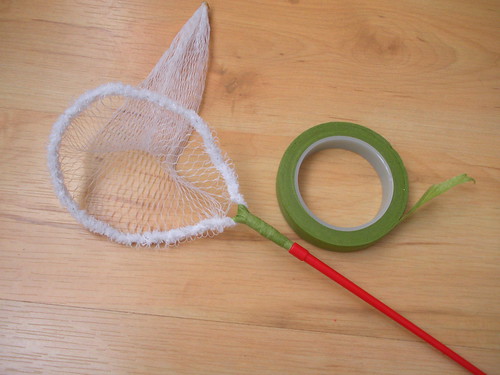
Step 5: Use the floral tape to wrap around the brush and over the wire to totally secure the net to the handle.

Doll Bug Net 5

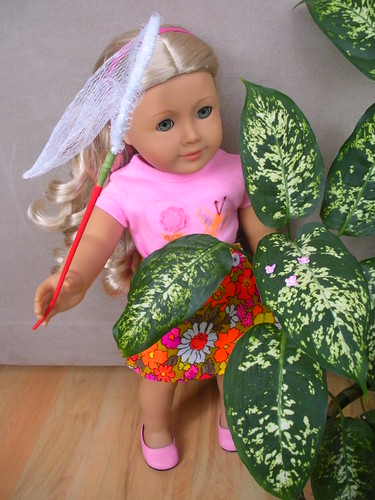
Step 6:  Look for bugs and butterflies to catch!

Doll Bug Net

Enjoy!