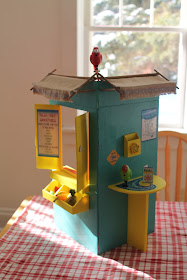
I am totally in love with Lea's entire collection! To help me NOT buy all of those big pieces, I decided to try crafting Lea's Bahia berry fruit stand. I really wish I were brave enough to try using power tools and working in wood, but I am not. Instead, I have been pretty happy with foam core. For this project I followed the tutorial from
Rudy at American Girl Ideas and looked at
Lissie and Lilly's measuremens, to help me get started and with placement of the window. I started by cutting the pieces out of non-paper lined foam core. (it was just solid foam, 1/4" thick and can be purchased at my local dollar store) Mine were too short, so I had to piece the larger pieces together and ended up making it about an inch shorter than American Girl's) I then painted all the sides and edges- some places needed 3 coats of paint, am so happy with the results! I painted a sheet aqua and a second sheet the dark coral, then hot glued them together. I used a gloss enamel acrylic craft paint from Walmart on the exterior and a flat acrylic on the interior (because I had them) but I like the gloss better, this looks a lot like wood which I love! The printable from American Girl Ideas are amazing and made this project SO easy! I printed the 'pattern' for each part, traced them into the foam coar, then used my exacto knife in a sawing motion to cut them out.
 |
| For cutting foam core, I like to use this snap off type of cutter, and leave it extended far enough to cut through the entire layer of foam. |
Rudy, from American Girl Ideas, also shared all the printable posters and decals she made! I printed them on heavyweight gloss paper and glued them on. Again- SO EASY!
 |
| My family lost our kitchen counter this weekend! |
 |
| I added an edge to the front counter with a 1/2" piece of foam core. I also made my fruit shelf a bit short then the tutorial. |
 |
| I opted to use bamboo to create my awning. I also used linen from an old pair of pants to create my sign, and I used tullip brand fabric markers to create my pattern. |
 |
| I made the little box from thick cardboard as I didn't have a tick tac container. |
 |
I still need to do a little work on the 'inside'. So far, I decided to glue real tile to my counter top and am really happy with the look!
Our 'girls' are starting to dream about spring break in Brazil... |
I did a little more work on the inside today. I did make the little silver shelf, but cannot find silver paint- I may have to buy one thing to make this project! So far I haven't spent anything yet! I took some pictures today with my Canon (pics above are cell phone pics with artificial lighting) and thought I would share. Once I get the last piece painted I will add additional photos! Almost all of the accessories and food items pictured below are from the Our Generation Aloha set. We have two of these sets and I am SO SO glad I picked them up last time I saw them available online. With the two sets you really have enough for a tropical dinner party!
Last update...I completed the inside.


Awesome job!
ReplyDeleteBella
I love it Amanda!!! AMAZING work! :)
ReplyDeleteIt looks really wonderful - a lot of work went into this project, I can tell. But what a great piece for 'doll play'! Please take a look at what I built for Lea as well - her RF hut. It is in two parts - the initial shell & the finished product, last weekend; I welcome your comments (YT channel - Shosy G). Thanks for inspiring us - take care ^_^
ReplyDeleteI keep coming back to look at these photos! You did such a fantastic job! It looks just like the AG version, and I'm amazed you were able to make it so quickly. ^_^
ReplyDeleteGreat job! I love the idea of using the AG Aloha set as accessories.
ReplyDeleteThis is really nice! I have been planning on doing this. Where did you find the birds? I got some beanie baby ones, but they look a little too big.
ReplyDeleteThe birds came from the Dollar Tree last summer! Hope they still have them! They came attached to a clip and made bird sounds (annoying until the battery dies!)
DeleteThe birds came from the Dollar Tree last summer! Hope they still have them! They came attached to a clip and made bird sounds (annoying until the battery dies!)
DeleteThanks for all the wonderful comments! It really was so much easier than it looks! I wish I were a woodworker, as I know the nature of foam core, and with time this may warp or the glue may eventually come apart.
ReplyDeleteThanks for all the wonderful comments! It really was so much easier than it looks! I wish I were a woodworker, as I know the nature of foam core, and with time this may warp or the glue may eventually come apart.
ReplyDelete